DUCT TESTING
Duct testing is the process of checking ventilation, heating and air conditioning vents and duct work for leaks.
If there are such leaks, they might cause several problems – first it means losing the hot air or cold air from your HVAC unit – translating to lost money and lost energy. Second, which is not less important, it can bring in contaminants and dust from your attic or crawl space, leading to bad air, particulates, or nuisance smells.
We measure duct air leakage and energy efficiency using special equipment and techniques. Leaks can be because of bad installation or can develop over time.
So, when in doubt about performance of your HVAC system, give us a call and we can walk you through the process.
Some technical aspects
Duct Leakage Testing, Basic Procedure
There are several ways to find duct leakage:
- Using a duct leakage tester and blower door together (the most common method)
- Using a flow hood
- Using a blower door and pressure pan (for diagnostic purposes only)
- Using a blower door only (not recommended)
The basic idea behind using a duct leakage tester to test for duct leakage is:
Use a calibrated fan to pressurize the duct system.
Measure the airflow through the fan with the duct system at pressure.
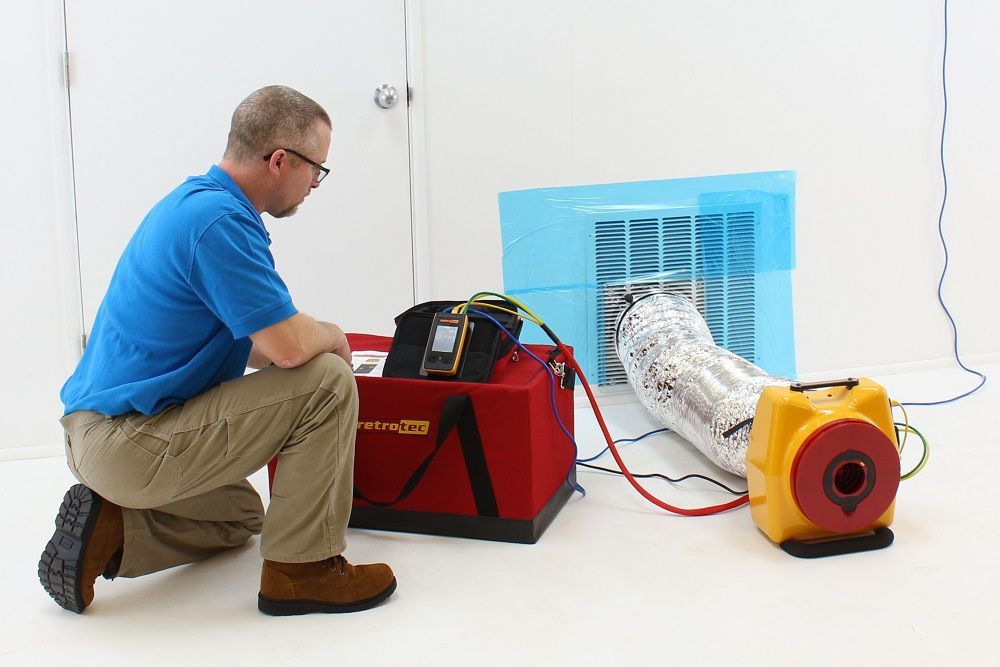
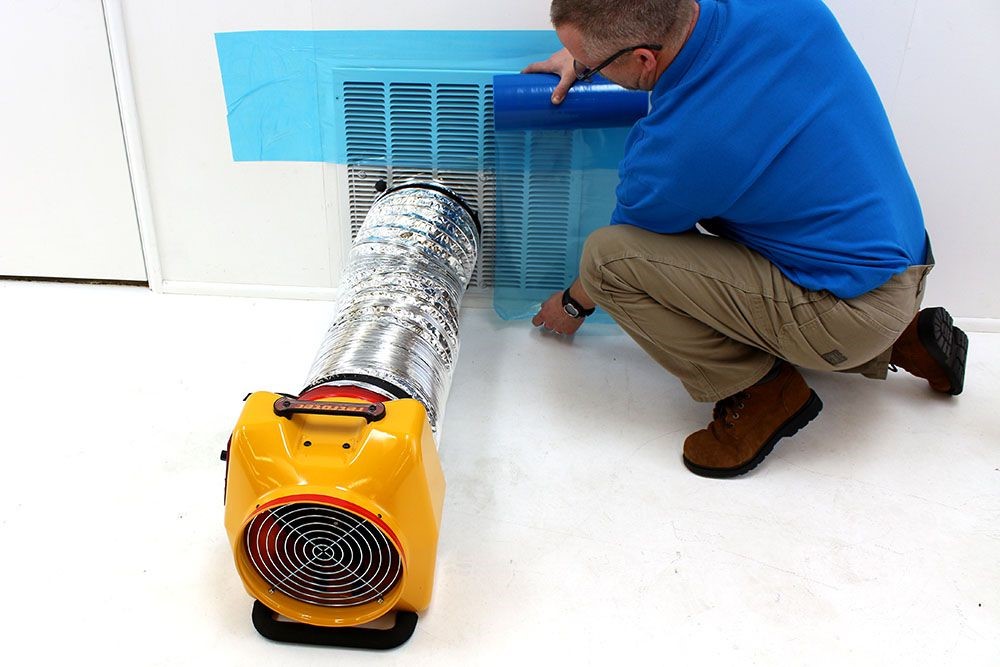
Just as when you’re testing for airtightness, each cubic meter of air that leaks out (of the duct system in this case) must be made up by a cubic meter of air blown in by the fan. So, once you’ve measured the amount of air moving through the fan, you’ve quantified the duct leakage at the test pressure.
Total Duct Leakage Test
Earlier describing the basic duct leakage testing procedure, we said that you pressurize the duct system and measure the airflow through the fan. To find the total duct leakage, that’s basically all you do. The only other thing you need to make sure you do is keep the spaces where the ducts are at the same pressure as the outdoors, as much as you can anyway.

The diagram above shows the setup for the total leakage test. The Duct Tester fan blows air into the duct system. Here it’s shown attached at the air handler, though most often it’s attached to a return vent. The crawl space and attic are both vented and thus close to the same pressure as outdoors. The house is shown having an open door or window to equalize pressures with the outdoors.
When the Duct Blaster is turned on and the system brought up to 25 Pascals of pressure, air will leak out wherever there’s a hole in the duct system. Some of that leakage, as we said before, is benign (to the conditioned space), and some is malignant (to the unconditioned spaces).
In order to determine how to eliminate the leakage to the conditioned spaces and measure only the leakage outside that the homeowners pay for, is described below.
Testing for Duct Leakage to Unconditioned Spaces
To isolate the amount of malignant leakage in a duct system, you have to eliminate the duct leakage to the conditioned space. It’s actually easy to do this because for air to leak from one place to another, two conditions must be met:
- There must be a pathway through which the air can move.
- There must be a pressure difference to drive the movement.
If some of the ductwork is in conditioned space, removing either of those two conditions will eliminate the leakage to the inside. Getting rid of the holes (condition 1) is not practical – and not even possible in some cases – so the key to finding how much the ducts leak to the outside is eliminating the pressure difference across the ducts inside the conditioned space.
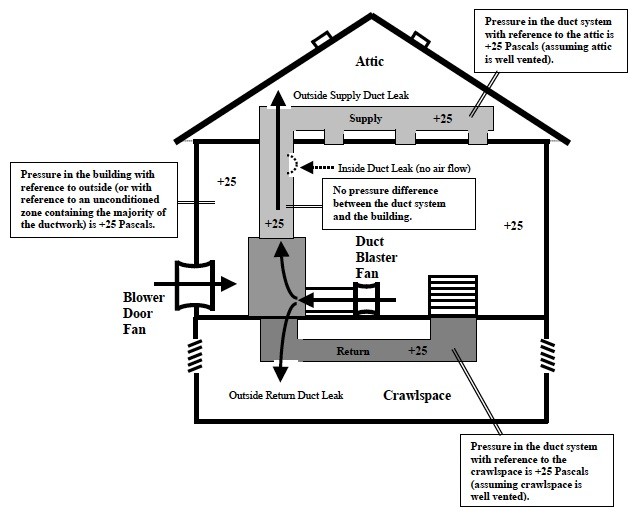
It just so happens that someone doing a duct leakage test also will have a device that can pressurize the house. It’s called the Blower Door and is used for measuring the airtightness of a house. As you can see in the diagram above, the procedure is to run the Blower Door to pressurize the house to 25 Pascals at the same time the Duct Tester is pressurizing the ducts to 25 Pascals. That creates equal pressures across the ducts that are in the conditioned space, and no air will leak to the inside.
With such setup, all the air that the Duct Tester is blowing into the ducts will leak outside of the conditioned space, thus giving us a measure of the ‘malignant’ duct leakage.
The number is usually given either as the straight cfm25 (cubic feet per minute at 25 Pascals) or as a ratio of the cfm25 to the conditioned floor area served by the system tested. For example, if a duct system has a result of 385 cfm25 for the leakage outside the envelope test and the conditioned floor area served is 2500 square feet, the ratio would be 385/2500 = 0.15 cfm25/sf.
Sometimes this number is multiplied by 100 and called the ‘percent duct leakage,’ which is actually a bit misleading. In the example above, the percent duct leakage would be 15%. Remember that it’s just a ratio, though, and not a true measure of what fraction of air is leaking. Because it’s just a ratio, it’s actually possible to get more than 100% duct leakage.
Another way it’s sometimes characterized is as a ratio of the cfm25 to the air handler flow. If the above 385 cfm25 occurred in a duct system attached to an air handler that can move 1200 cfm of air, this ratio would be 0.32, or 32%. Always make sure you know whether a normalized duct leakage number is referenced to the floor area or the air handler flow. They can be quite different.